Battle Introduction:
Battle interface:
Shoot
- Shoot bombs at enemy baby dragons in basic game play mode.
- Shoot: To shoot, touch the dragon and make a dragging
motion. This creates a trajectory. Aim the trajectory at your target. Release to
fire.
Move
- Left: To move left, press left arrow at ①.
- Right: To move right, press right arrow at ②.
- Note: moving consumes MP.
Switching Abilities/Bombs
- The biggest circle at ③ shows what type of rock you are
throwing. Tap to change rocks.
- A locked ability indicates that your dragon hasn't learned
the ability yet. Check the Dragon page in Haypi Town to see if you can learn
it.
- The icons listed at ④ are your dragon's abilities. Tap
an ability to use it.
- Use your dragon's special abilities to make its attacks
more powerful. Abilities cost MP.
- On the far right of ④ is the Rage skill. This skill does
not need to be learned. Once Rage is full, it's ready for use and doubles
the damage of your attacks.
- At ⑤ is the Paper Plane skill. This skill does not need
to be learned. Tap the paper plane to send your dragon to another location. Don't aim your paper plane
at a high place
where your dragon is unable to stand, or else it will lose its balance and
fall.
Battlefield Info
- ⑩ shows wind info. The number represents the strength of the
wind and the arrow shows the direction the wind is blowing. The wind influences
where your rocks land.
- The stronger wind force it has, the bigger influence there will be.
- Stronger winds cause stronger influence.
Battle Score Tallies
Score Results page
- After you complete each level, the Results page shows your
score.
- Position ① shows the item you win. You won't always get an
item.
- Position ② shows your scores. The green
indicates your scores while the yellow indicates the experience you gain.
- Position ③ shows your final score. The higher the score is, the more stars you will get.
Results page
- After the Results page, you will reach a page with a
Rewards Wheel.
- Position ① shows the rewards you can get from the Rewards Wheel. You need to
spin the wheel to see what you will get.
- Press Auto Spin at ② to see your reward.
- Please note that your scores influence the value of your rewards.
- If you are unhappy with your reward you can spin again, but
it will cost 1 coin.
Level Type
There are 6 types of levels in the game: Normal level, Reward level, Boss level, Unactivated level, Key level and Locked level.
Level Scenes
Scene Selection page
- Tap ① to enter the Ancient Forest, where trees, grass and beautiful flowers
grow. There are 15 levels; Boss Leshy awaits you at the final level.
- Tap ② to enter Elf City, which is full of debris and
dilapidated buildings. There are 15 levels; Boss Lava awaits you at the final level.
- Tap ③ to enter Ice Hill, where all is covered in ice.
Everything is extremely slippery. There are 30 levels; Boss Cystal awaits you at the final level.
- Tap ④ to enter Dragon Valley, grave of megalo dragons whose dragon bones
make you tremble with fear. There are 45 levels; Boss Cystal awaits you at the final level.
Resources in Game Levels
|
|
 |
Stars: You can find stars floating in the air throughout
various levels. Each star you grab will raise your score by 1000 points,
which makes an impact on whether or not you can get a rating of 3 stars.
However, grabbing stars isn't required for passing the level. |
 |
Money: You will only find them in reward levels. Grab them and you will
automatically gain 10 money. |
 |
TNT: This TNT barrel is filled with dangerous explosives.
Once hit, it will blow up and with a thunderous sound. |
Introduction
 |
Plant Summoner-Leshy:
Leshy, though full of potential, is a dragon without powerful skills. Don't worry
too much about him.
Appearance: BOSS level 1-15 in Ancient Forest Scene
Tame odds: 30%
Skills: none
|
 |
Flame Thrower -Lava:
Lava is a crank guy. He is the master of flames and has 4 minions
protecting him so he's difficult to beat.
Appearance: BOSS level 2-15 in Elf City Scene
Tame odds: 10%
Skills: Fires flame at the enemy and does extra fire damage
over the next two turns.
|
 |
Ice Blaster -Crystal:
Crystal is the proud master of the ice world. He is the master
of three formidable skills. Watch out for both sky and ground
attacks when challenging him.
Appearance: BOSS level 3-30 in Ice Hill Scene
Tame odds: 3%
Skills:
Rage—A haughty Crystal will fill with outrage after suffering severe damage. His attack
power will increase significantly.
Hailstorm—Summons an ice-cube out of the sky and
turns it into hail. This can freeze your dragon for 1
turn.
Tremor—Causes the marked area of the ground to
tremor, causing damage to the dragons standing on
top of it.
|
 |
Fatty dragon--leader of fat dragon clan:
This fatty guy cannot be tamed. His Ghost Puncture skill contains
unimaginable power and is even more dangerous at home
den.
Appearance: BOSS level 4-20 in Dragon Valley Scene
Tame odds: 0%
Skills:
Ghost Puncture—Summons a ghost that will rise up and
cause great damage to the dragons and objects that he
passes along the way.
|
 |
Angel dragon—Angelo:
This powerful little dragon has 3 skills. You'd
better watch out. She is extremely difficult to beat.
Appearance: BOSS level 4-45 in Dragon Valley Scene
Tame odds: 1%
Skills:
Angel's advent—When activated, Angelo's health is
restored to 100%. Angel's Advent will only be activated
when Angelo is not burning, ensnared, or stunned.
Angel's Prayer—She answers the prayers of her
followers and increases their power.
Death and Success—Her death saddens her
followers, causing them to gain unprecedented power.
|
Teaming-up for Bosses
Select Room
- On boss levels, instead of entering battle immediately, you
come across a list of rooms.
- Select one and press ③ to enter.
- You cannot access a room if it is already full, in combat,
or password-locked.
- If you find it hard to select a room, press Quick Enter at ②
and system will automatically put you into a room if one is available.
- You also can create a room of your own at Create Room ① and
create your own team.
- Select a scene
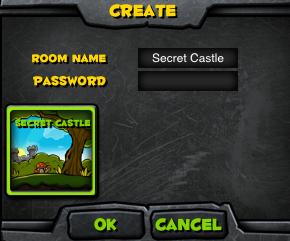 when creating your room.
You can choose whether or not you want the room to be password-locked.
when creating your room.
You can choose whether or not you want the room to be password-locked.
Waiting Room
- The four boxes in the red rectangle contain information
about you and your teammates. Locked squares containing the sign
 indicates that those extra spots are not available for the boss fight. The
picture above shows that this boss fight only allows up to 2 players.
indicates that those extra spots are not available for the boss fight. The
picture above shows that this boss fight only allows up to 2 players.
- As room master, you have the authority to kick any player
out of this room by clicking his/her dragon image.
- As host, you can click "invite" at ② to invite a friend to this room
to be your teammate.
- When all teammates are "READY", you as host can click
START ① to start the BOSS fight.
- If you're just an ordinary team member, INVITE at ② doesn't work for you. Click ① to
notify you teammates that you are ready for the battle.
How Do Boss Level Rewards Differ from Other Levels?
- You will receive far better rewards from boss levels than
you will in either normal or reward levels.
- Boss levels can grant you better stones or even a piece of
the treasure map. Gather all pieces of the map to explore relics in ancient
times!
- When you defeat a boss, there is chance you can train it to
be your new dragon. This in itself is a tantalizing reward.
Cooldowns after Boss Fights
- After beating a boss you will receive a cooldown period of
120 minutes, during which you cannot access a boss fight.
- You will not receive a cooldown period if you lose the boss
fight.
- During cooldown (CD) time, you can click the lightning icon to
finish CD instantly. It will cost you 10 coins.
Use of Battle Score?
- Each level you pass gives you a score. The player with the
highest score will have their name marked on the top of the results page, where
all other players can see.
- Scores influence how many stars you get, which in turn
decide the value of the rewards in the lucky wheel. The higher your score, the
better rewards you will receive.
How Can I Get a Higher Score?
- Your score is determined by many factors.
- First of all, you receive 2000 points for each enemy you
kill.
- You are expected to complete a level within a certain number
of turns. Complete it within the number of turns and you will get 2500 points.
Extra turns will cost you 1000 points, until all 2500 points are lost.
- Many of the levels contain green stars, grab one and you
gain 1000 points.
- The percentage of health you have left is also taken into
consideration. Full health gives you 2500 points, so defense stones should never
be neglected.
- Damage to objects like lumber, ice, and bricks will give you
more points. The harder the object is, the more points you will get, and of
course, the more difficult it will be for you to break them.
Back to Top 


